Sales, Returns and Exchanges By Location (POS)
Many of our merchants run multiple Point of Sale (POS) retail locations.
For these merchants, tracking exactly where sales, refunds, payments, and credits occur — and attributing those amounts to the correct retail location — is vital to balancing the books.
In this guide, we go over some of the tools you can use to successfully attribute these sales in Report Toaster and make managing your returns, exchanges, and finances much easier.
Let's take a look.
Tracking Locations
First of all, we'll start off with the most basic steps of splitting the POS sales across your different locations.
For this, we'll start off with the Sales by POS Location report under the Retail section in the left-hand menu:
(click image to enlarge)
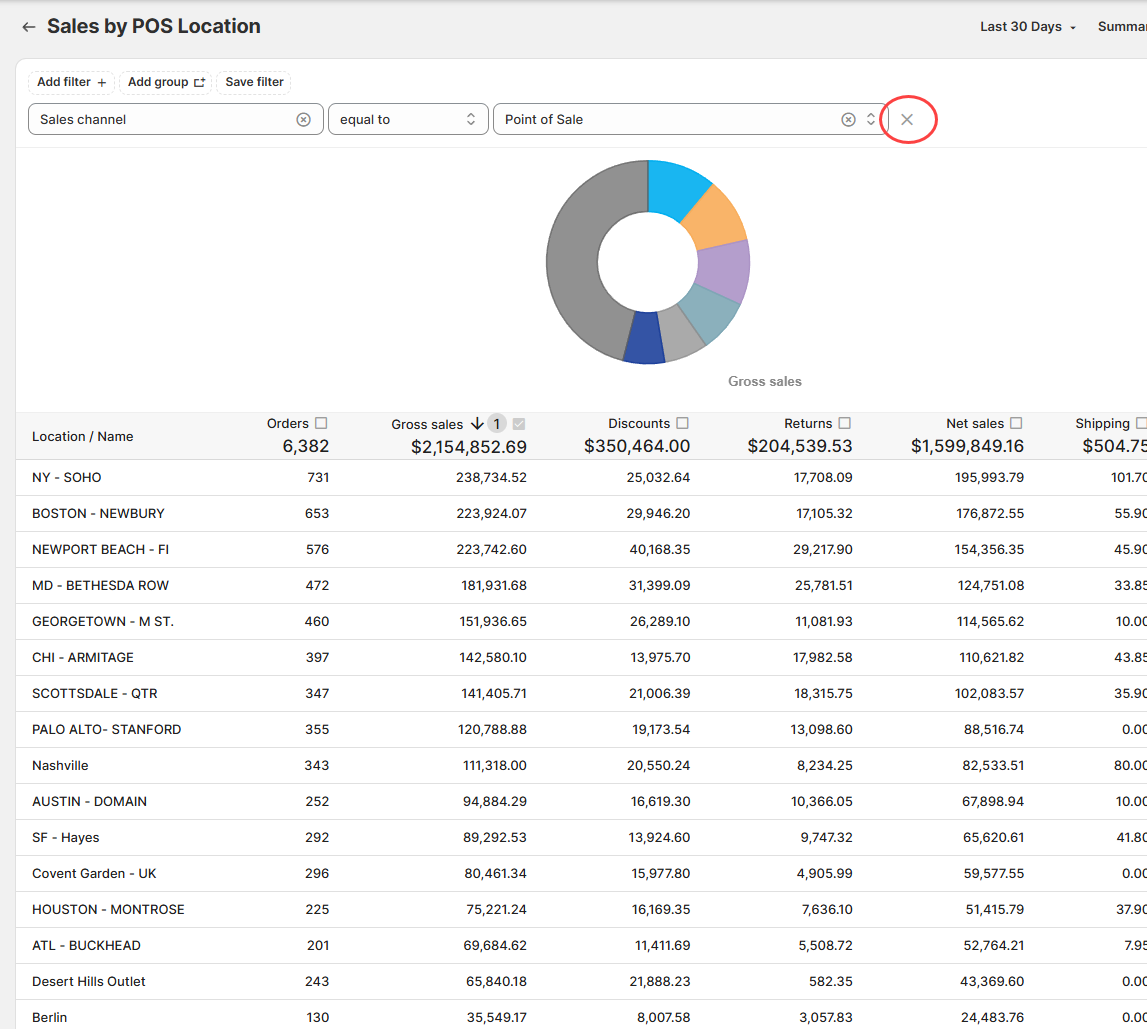
Here we can see the sales clearly split across the various POS locations according to their individual location names.
Note - If you want to include all your sales channels here (e.g. Online Store as well), you can simply delete the filter at the top with the red "X".
Attributing Sales and Refunds
The next step we can take is breaking out sales and refunds into separate lines.
-
First, add the column for Type. This will break down the results into different rows for different sales lines (Sale, Refund, Shipping, Payment, Credit).
-
Then filter the results to show only Sales and Refunds.
-
Finally, we recommend sorting the results by Location Name and then Type. This will group the results by location and then by type.
(click image to enlarge)
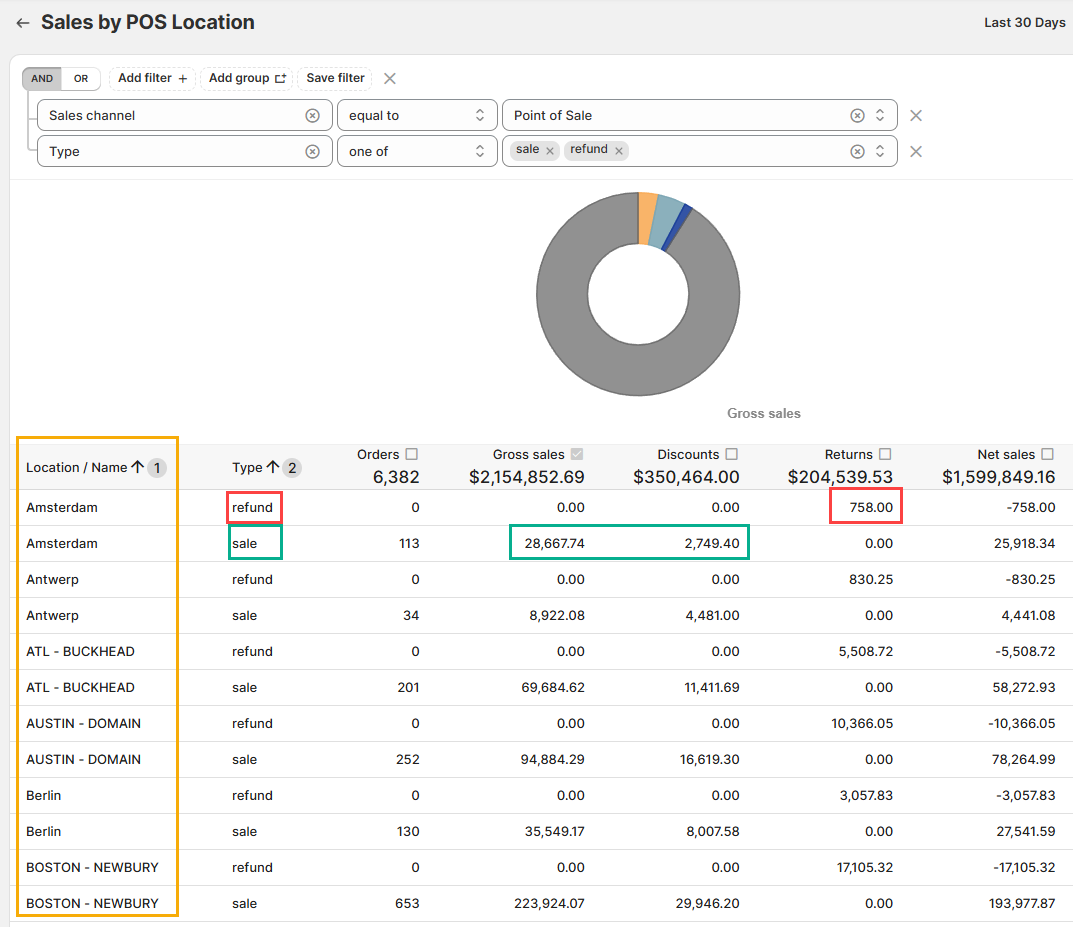
You can see that now we get two rows for each location — one for all sales, and one for all refunds.
-
All Sales will have the count of Orders (and Quantity if that column is included), with the amounts reflected in Gross Sales, Discounts, and Net Sales.
-
All Refunds will be reflected in the Returns column. These show as 0 orders since they are not purchases (this prevents orders from being double counted if they contain both a sale and a return).
Returns and Exchanges
So why might we want to split the data like this?
This is particularly useful when reviewing returns or exchanges, because items can be purchased at one location but refunded at another.
The easiest way to see this is by reviewing an individual order in the Financial Detail report (under the Financial section).
If we filter for a single order number, we can see the entire history of the order broken out into individual sales lines.
1.) Returns
Here we can see the item was sold at the Online Store (which has no Location ID) and then refunded at an in-store location.
(click image to enlarge)

2.) Exchanges
Exchanges appear similar, except there will often be an additional purchase at the refund location. This happens because an exchange is technically processed as a refund of one item and a new sale of another.
(click image to enlarge)

In this example:
-
The customer made an initial purchase (green).
-
They then went to Location B where the item was refunded (red).
-
A new item was purchased (yellow).
Due to a Shopify limitation, exchange sales will only be properly allocated to the location of the store where the exchange took place for Shopify Plus customers.
This makes it much easier to balance your books by attributing sales and refunds to the correct location IDs.
Including Payments
For some merchants, it's important to know not only where sales and refunds occurred, but also where payments occurred.
To do this, simply adjust the filter used earlier.
Along with sale and refund, add the following values to the Type filter:
-
payment – payments made by the customer
-
credit – payments made by the merchant (refunds)
This will add the payment and credit lines to the report, and the location ID will populate based on where the transaction was processed.
For example, here this order has:
-
A sale (with a corresponding payment)
-
A refund (with a corresponding credit)
(click image to enlarge)

This can be particularly useful if your store accepts split payments or buy-now-pay-later methods, where payments or credits may occur on different days or locations than the original purchase.
Further Details
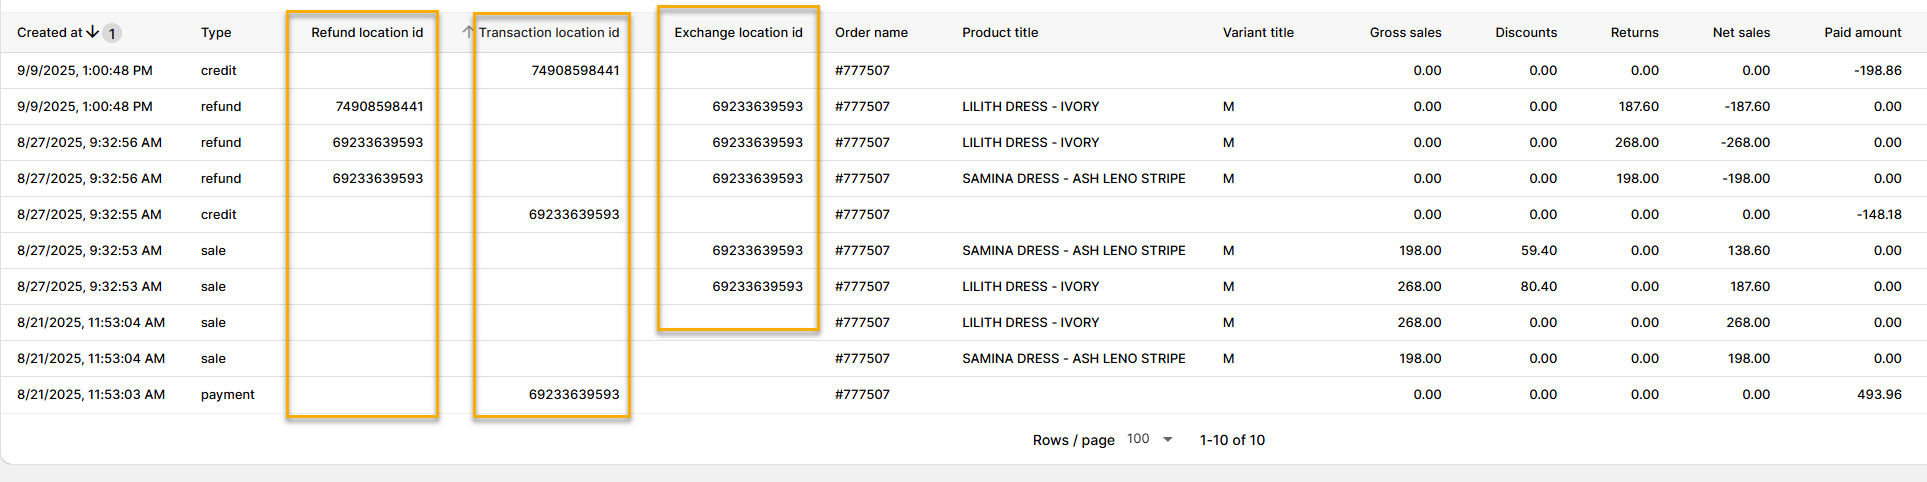
There are many other fields you can add to this view, making it extremely helpful for investigating individual orders.
For example, you can add columns such as:
-
Refund Location ID
-
Transaction Location ID
-
Exchange Location ID (Shopify Plus)
These fields allow you to see not only what happened in an order, but also exactly where and when each step occurred.
(click image to enlarge)
Hopefully this guide helps you attribute your sales, refunds, and payments to the correct locations.
If you need help setting up a custom report for your store, feel free to reach out to us at [email protected].